Clip Mask
How I implemented the Matter Splatter Galaxy Effect in Super Mario Odyssey
If you played Super Mario Galaxy, you have probably come across this effect before, where parts of an object are made visible by an unknown force.
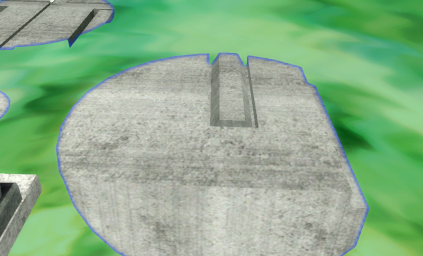
This example is from Matter Splatter Galaxy but the effect can also be found in Ghostly Galaxy and inverted in Bowser’s Dark Matter Plant. This effect is not only visual, but the collision is only enabled in the visible areas, creating a fun platforming challenge. I will call this effect “Clip Mask” from now on.
Even though it isn’t used in that many places in game, the Clip Mask requires digging a bit in the game dev toolbox in
order to achieve the iconic look. This again shows the level of detail Nintendo puts into their games.
Because of that, implementing it in Super Mario Odyssey requires both finding out how the Clip Mask was achieved and how
to make all that possible in Super Mario Odyssey. It involves creating the first custom shaders ever made for Super
Mario Odyssey, creating a custom ModelDrawer for our custom actors and rendering to custom textures using RenderBuffers.
Clip Mask in Super Mario Galaxy
Luckily there has been a lot of reverse engineering effort already put into that game. Not only decomp-wise but also for reimplementation in the browser with noclip.website. This will become incredibly useful for creating the shaders we need later since the Wii only had a color combiner and wasn’t capable of computing a full shader, while the Switch requires the use of shaders.
The Clip Mask Scene
First off, we will start with the different objects and their uses in the scene:
- SimpleClipPartsObj is the object which is masked by the effect. In the picture from before this is the big platform.
- ClipArea is the base class to implement for the masking actors. ClipAreaMovable is a version which supports rails (moving) and ClipAreaDrop is spawned by the laser splash effect ClipAreaDropLaser.
- ClipAreaHolder holds all instances of ClipArea so that collision can be checked in a centralized way.
- ClipFieldSwitch checks if the player is inside a ClipArea and enables/disables a switch based on that. This allows SimpleClipPartsObj to activate/deactivate their collision based on this switch.
- FallOutFieldDraw is responsible for rendering the entire Clip Mask effect.
Each ClipArea has an instance of a subclass of ClipAreaShape. SMG has cone, box and sphere shapes while only the latter two are used.
Collision
Low-hanging fruits first, the collision is pretty simple. ClipAreaShape has a member function which checks if a given vector is inside that shape. This is just some basic math for both the sphere (squared distance check) and the box ( bounding box check). That function is called from the ClipFieldSwitch over the ClipAreaHolder which updates its state accordingly. Every SimpleClipPartsObj checks for that switch each frame and enables/disables its collision based on the switch value.
Rendering
Volume Mask
The rendering visually works similar to the boolean mask in Blender. Imagine that the flat box is the SimpleClipPartsObj
and the sphere is a ClipAreaShape (left). When applying the boolean effect (right) you see that only the intersecting
parts
remain. 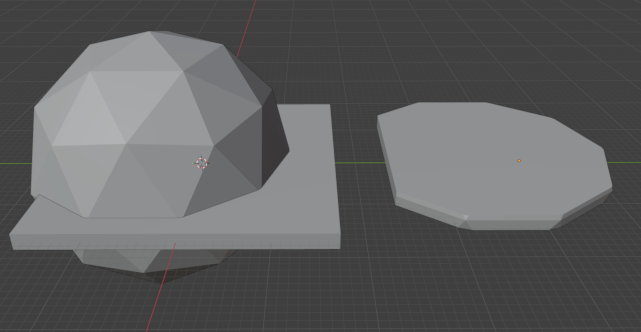
Subclasses of ClipAreaShape load a model archive found in the game files which corresponds to their shape. The visual is achieved using a volume mask in game. Here is the list of render passes it goes through:
- SimpleClipPartsObj are all fully rendered to the main target
- ClipAreaShape back faces are rendered to a R8 color target using additive blending when they are behind a SimpleClipPartsObj.
- ClipAreaShape front faces are rendered to the same R8 target using subtractive blending when they are behind a SimpleClipPartsObj.
With this simple trick we can detect if a ClipAreaShape intersects with a SimpleClipPartsObj. When it does, the back faces are rendered because they are behind and the front faces aren’t drawn because they aren’t behind the object. The result is a non-zero value in the mask target.


The footage was taken in Super Mario Odyssey since this was the easiest way for me to show the inner workings of the system. The original game draws to the alpha channel (according to a comment in the noclip code) instead of a separate R8 target but the result is the same. This trick comes with the limitation that the amount of back faces at a fragment should not exceed the maximum value of the mask target, being 255.
Compositing
With that we can finally move on to the compositing render passes. Because of the blue edge effect, this isn’t as simple as clearing the color from the main target based on the mask. We have to do some pre-processing before.
The idea is that the mask target is downsampled twice and then blurred. Both the downsampling and the blur cause the downsampled + blurred target to have a slight gap between the part that is masked and unmasked in the last step.
In the video you can see the difference between the downsampled mask and the twice downsampled + blurred mask. You might be able to notice a difference in the size. For the video I inverted to effect to reduce the strain on your eyes. The first downsampling step uses a threshold program to convert the black to slightly gray mask into a binary value space. The sampler uniform is the mask texture which is rendered on the first downsampled texture:
in vec2 vTexCoord;

layout (binding = 0) uniform sampler2D uTexture;

layout (binding = 1, std140) uniform ClipDrawParams {
    vec4 uEdgeColor;
    bool uInvert;
};

layout (location = 0) out vec4 output_color;

float SampleMask(in sampler2D tTextureMask, in vec2 tTexCoord) {
    bool tRawMask = texture(tTextureMask, tTexCoord).r > 0.0 ? true : false;
    bool tMask = uInvert ? tRawMask : !tRawMask;
    float tValue = tMask ? 1.0 : 0.0;
    return tValue;
}

void main() {
    float tMask = SampleMask(uTexture, vTexCoord);
    output_color = vec4(tMask);
}
The texture then is downsampled another time using a default blit program. The result is then passed as a uniform and drawn onto itself:
in vec2 vTexCoord;

layout (binding = 0) uniform sampler2D uTexture;

layout (binding = 1, std140) uniform ClipDrawParams {
    vec4 uEdgeColor;
    bool uInvert;
};

layout (location = 0) out vec4 output_color;

vec2 BlurAspect(in sampler2D tTexture) {
    vec2 tSize = vec2(textureSize(tTexture, 0));
    vec2 tAspect = vec2((tSize.y / tSize.x) / (3.0 / 4.0), 1.0);
    return tAspect;
}

vec2 Blur(in sampler2D tTexture, in vec2 tTexCoord, in vec2 tAspect) {
    vec3 c = vec3(0.0);
    c += texture(tTexture, tTexCoord + tAspect * vec2(1.0 * 0.004, 0.0)).rgb;
    c += texture(tTexture, tTexCoord + tAspect * vec2(0.309017 * 0.004, -0.951057 * 0.004)).rgb;
    c += texture(tTexture, tTexCoord + tAspect * vec2(-0.809017 * 0.004, -0.587785 * 0.004)).rgb;
    c += texture(tTexture, tTexCoord + tAspect * vec2(-0.809017 * 0.004, 0.587785 * 0.004)).rgb;
    c += texture(tTexture, tTexCoord + tAspect * vec2(0.309017 * 0.004, 0.951056 * 0.004)).rgb;
    return c;
}

vec2 saturate(vec2 v) { return clamp(v, vec2(0.0), vec2(1.0)); }

void main() {
    vec2 tAspect = BlurAspect(uTexture);
    float tBlurredMask = saturate(Blur(uTexture, vTexCoord, tAspect)).r;
    output_color = vec4(tBlurredMask);
}
For the compositing pass the constant edge color alpha is multiplied with the downsampled + blurred mask brightness and blended together with the scene. The sampler is the downsampled + blurred mask and everything is rendered onto the main target.
in vec2 vTexCoord;

layout (binding = 0) uniform sampler2D uTexture;

layout (binding = 1, std140) uniform ClipDrawParams {
    vec4 uEdgeColor;
    bool uInvert;
};

layout (location = 0) out vec4 output_color;

void main() {
    float tBlurredMask = texture(uTexture, vTexCoord).r;
    vec4 tColor = uEdgeColor;
    tColor.a *= tBlurredMask;
    output_color = tColor;
}
In the last step the remaining parts are masked out using the raw mask target from the beginning. It works pretty much like the threshold program from before but also needs to draw to the third output color because SMO has a deferred rendering system.
in vec2 vTexCoord;

layout (binding = 0) uniform sampler2D uTexture;

layout (binding = 1, std140) uniform ClipDrawParams {
    vec4 uEdgeColor;
    bool uInvert;
};

layout (location = 0) out vec4 output_color;
layout (location = 3) out vec4 output_color3;

float SampleMask(in sampler2D tTextureMask, in vec2 tTexCoord) {
    bool tRawMask = texture(tTextureMask, tTexCoord).r > 0.0 ? true : false;
    bool tMask = uInvert ? tRawMask : !tRawMask;
    float tValue = tMask ? 1.0 : 0.0;
    return tValue;
}

void main() {
    float tMask = SampleMask(uTexture, vTexCoord);
    if (tMask <= 0.0)
    discard;
    output_color = vec4(0.0);
    output_color3 = vec4(0.0);
    gl_FragDepth = 1.0;
}
All the shader code is almost 1:1 of what noclip.website uses, so again big thanks to them.
Implementing it in Super Mario Odyssey
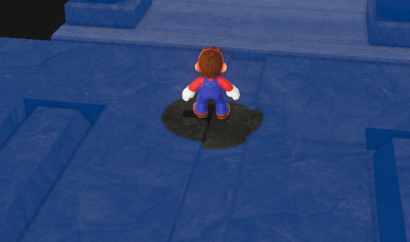
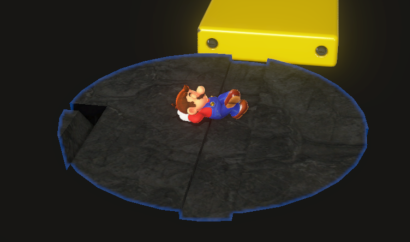
The demonstration images from earlier already show how the effect looks like in Super Mario Odyssey, I’m sorry for the spoilers. I will not go in depth with the actor code since that is pretty straight forward, but I will provide the source code at a later date so you can check it out yourself. We first need to know where the important stuff is happening to build on that.
Executors
The game uses an executor system to update or draw different objects at different points in time. You can either specify
in the romfs what executor a model belongs to or use something like
al::initExecutorDraw(this, initInfo, "DRAW_LIST"); to add it manually. I needed a few new draw lists as listed here:
static constexpr al::ExecuteOrder customDrawTableArr[] = {
    /// "external" drawers like the laser
    {"Clip Area Draw", "Functor", 8, "アクター"},
    /// Objects that can be clipped (SimpleClipPartsObj)
    {"Clipped Map Parts", "ActorModelDrawDeferred", 32, "地形"},
    /// Volume mask objects
    {"Clipped Map Parts Mask", "ActorModelDrawClipMask", 64, "アクター"},
    /// Compositor (FallOutFieldDraw)
    {"Clip Area Mask", "Functor", 1, "システム"}};
The table of draw lists is predefined in the games code, so I had to add my lists manually with a small code patch. The actual table is generated from the lists because the game maps some lists into one draw table. Since there was no reason for me to combine some of these passes, I created a draw table for each one separately:
constexpr al::ExecuteTable CustomDrawTable[] = {
    createDrawTable("3D (Clip Area Draw)", "Clip Area Draw", "Functor", "Clip Area Draw",
                    "Functor"),
    createDrawTable("3D (Clipped Map Parts)", "Clipped Map Parts", "ActorModelDrawDeferred",
                    "Clipped Map Parts", "ActorModelDrawDeferred"),
    createDrawTable("3D (Clipped Map Parts Mask)", "Clipped Map Parts Mask",
                    "ActorModelDrawClipMask", "Clipped Map Parts Mask", "ActorModelDrawClipMask"),
    createDrawTable("3D (Clip Area Mask)", "Clip Area Mask", "Functor", "Clip Area Mask",
                    "Functor"),
};
The code for the draw table generation can be found in
the Odyssey Decomp inside the ExecutorTablesImpl.h file.
struct ExecuteDirectorInitHook : exl::hook::impl::TrampolineHook<ExecuteDirectorInitHook> {
    static void Callback(al::ExecuteDirector* thisPtr, const al::ExecuteSystemInitInfo& initInfo) {
        Orig(thisPtr, initInfo);

        s32 oldCount = thisPtr->mDrawTableCount;
        thisPtr->mDrawTableCount += CustomDrawTableSize;

        for (s32 i = 0; i < CustomDrawTableSize; ++i) {
            thisPtr->mDrawTables[oldCount + i] = new al::ExecuteTableHolderDraw();
            thisPtr->mDrawTables[oldCount + i]->init(CustomDrawTable[i].name, initInfo,
                                                     CustomDrawTable[i].executeOrders,
                                                     CustomDrawTable[i].executeOrderCount);
        }
    }
};

void initPatches() {
    exl::patch::CodePatcher patcher(0x891344);
    patcher.WriteInst(exl::armv8::inst::Movz(
        exl::armv8::reg::X0, 0x160 + CustomDrawTableSize * sizeof(al::ExecuteTableHolderDraw*)));

    ExecuteDirectorInitHook::InstallAtSymbol(
        "_ZN2al15ExecuteDirector4initERKNS_21ExecuteSystemInitInfoE");
}
The assembly patch is used to increase the allocation size of the draw table while the trampoline hook adds the custom
entries at the end of it. The result is that we can add our objects to their executor tables and call the model drawer
functions of them separately. As you can see in the first code snippet (customDrawTableArr), there are 3 more
parameters to talk about. The second parameter is the kind of drawer that is used. Functor means that the user
specifies a custom function, ActorModelDrawDeferred uses the deferred model drawer from the game and
ActorModelDrawClipMask uses my custom model drawer I will talk about in a second. The third parameter specifies the
max amount of objects (I think) and the for the fourth I couldn’t find the uses in game. I theorized that objects can be
added to multiple drawers using a single string that matches this parameter, but I wasn’t able to prove that theory.
Custom Model Drawer
Next I wanted to render my volume masks using a custom model drawer. SMG had a way to render a simple object using a
basic function call while SMO doesn’t provide such an easy-to-use interface. This is why I had to resort to a system
that was more involved to set up but probably also better performance wise. One model drawer can add and remove models
and needs to implement a draw and a createTable member function inherited from al::ModelDrawerBase:
void ModelDrawerClipMask::createTable() {
    ModelDrawerBase::createTable();
    auto* model = mModelKeeper->getModelCtrl()->getModelObj();
    mMeshDrawerTable = new al::MeshDrawerTable(model->GetNumShapes());
    for (s32 i = 0; i < model->GetNumShapes(); ++i) {
        al::ModelShader* shader = mGraphicsSystemInfo->getModelShaderHolder()->createShader(
            mModelKeeper->getModelCtrl(), i, al::ModelShaderHolder::SHADER_TYPE::UNK0,
            "alRenderMask", nullptr, 0, nullptr, nullptr);
        mMeshDrawerTable->insert(new al::MeshDrawer(
            al::MeshDrawerInitArg(model->m_Shapes[i].mShape->mName->string, mGraphicsSystemInfo,
                                  model, &model->m_Shapes[i], shader, mModelMaxNum)));
    }
    createModelDrawDisplayList(mModelMaxNum * model->GetNumShapes() * 0xe0 + 0x100);
    alModelFunction::createMeshDrawerDisplayListGraphicsContextInvalidate(mMeshDrawerTable,
                                                                          mModelKeeper, nullptr);
}

void ModelDrawerClipMask::draw() const {
    if (!isDraw())
        return;

    s32 drawBufIdx = getDrawBufferIndex();
    al::ModelAdditionalInfo additionalInfo{mGraphicsSystemInfo};

    agl::DrawContext* prepCtx =
        mDrawDisplayList->prepDraw(mDrawCtx, mMeshDrawerTable, mModels, mModelNum, drawBufIdx);
    if (prepCtx) {
        sead::GraphicsContext ctx{};
        ctx.enableBlend = true;
        ctx.blendSrcFunc = NVN_BLEND_FUNC_CONSTANT_ALPHA;
        ctx.blendDstFunc = NVN_BLEND_FUNC_ONE;
        ctx.blendColor[3] = 1.0 / 255.0;
        ctx.depthTest = true;
        ctx.depthFunc = NVN_DEPTH_FUNC_GEQUAL;
        ctx.depthWrite = false;
        ctx.channelMaskR = true;
        ctx.channelMaskG = false;
        ctx.channelMaskB = false;
        ctx.channelMaskA = false;

        ctx.blendModeRGB = NVN_BLEND_EQUATION_ADD;
        ctx.cullFace = NVN_FACE_FRONT;
        ctx.apply(prepCtx);

        for (const auto& drawer : mMeshDrawerTable->mMeshDrawers) {
            drawer.draw(prepCtx, &mGraphicsSystemInfo->mViewVolume, 0, drawBufIdx, &additionalInfo);
        }

        ctx.blendModeRGB = NVN_BLEND_EQUATION_REVERSE_SUB;
        ctx.cullFace = NVN_FACE_BACK;
        ctx.apply(prepCtx);
        for (const auto& drawer : mMeshDrawerTable->mMeshDrawers) {
            drawer.draw(prepCtx, &mGraphicsSystemInfo->mViewVolume, 0, drawBufIdx, &additionalInfo);
        }
    }
    mDrawDisplayList->callDraw(mDrawCtx, mMeshDrawerTable, mModels, mModelNum, drawBufIdx);
}
createTable is called each time a model is added or removed. Inside the draw function you see prepDraw returning an
optional agl::DrawContext. The value is null when none of the objects have been changed since the last draw call.
Since I
had control over the rendering process I was able to render both the back and front passes after another with the
blending settings I talked about earlier. While the code doesn’t look too complex, it was quite a pain to debug earlier
versions since every missing piece can break the results and are hard to track. Always look out for undefined behavior
caused by incorrect headers. Don’t forget to call one of alModelFunction::createMeshDrawerDisplayList... to prevent
your models from flickering fast and only use the prepDraw DrawContext inside the if statement to prevent a slow
flicker. For the magic values in the createModelDrawDisplayList call I have no idea what the minimum requirement is,
so I just used the values of the forward model drawer.
Before we are able to call the model drawer, we have to add it as an executor list so that the game knows what model
drawer it should use when referring to ActorModelDrawClipMask. That requires a factory class since some model drawers
have a few more settings in their constructor, resulting in the same model drawer class (not object!) being used for
multiple executor lists. For us, this is as easy as creating ExecutorListActorModelDrawClipMask inheriting from
al::ExecutorListActorModelDrawBase and returning a new ModelDrawerClipMask(name) in createDrawer. With the factory
class we can patch the game to use it when initializing ActorModelDrawClipMask for the executor list and add it to
alExecutorFunction::isDrawListActorModel which is used to determine another allocation size.
struct IsDrawListActorModelHook : public exl::hook::impl::TrampolineHook<IsDrawListActorModelHook> {
    static bool Callback(al::ExecuteOrder& order) {
        if (al::isEqualString(order.executeGroup, "ActorModelDrawClipMask")) {
            return true;
        }
        return Orig(order);
    }
};

struct ExecuteTableDrawInitHook : public exl::hook::impl::InlineHook<ExecuteTableDrawInitHook> {
    // optional
    enum Branch { NotTaken, Taken };

    static constexpr ptrdiff_t Branches[] = {0x0, 0x6b8};

    static uint8_t Callback(exl::hook::InlineCtx* ctx) {
        const auto* order = std::bit_cast<const al::ExecuteOrder*>(ctx->X[19]);

        if (alExecutorFunction::isListName(*order, "ActorModelDrawClipMask")) {
            auto* list = new clip::ExecutorListActorModelDrawClipMask(
                order->listName, order->listMaxSize,
                *std::bit_cast<al::ExecuteSystemInitInfo*>(ctx->X[20]));

            auto* thisPtr = std::bit_cast<al::ExecuteTableHolderDraw*>(ctx->X[21]);
            thisPtr->registerExecutorListActorModel(list);
            ctx->X[27] = std::bit_cast<uintptr_t>(list);
            return Taken;
        }
        return NotTaken;
    }
};

void modelDrawerPatches() {
    IsDrawListActorModelHook::InstallAtSymbol(
        "_ZN18alExecutorFunction20isDrawListActorModelERKN2al12ExecuteOrderE");
    ExecuteTableDrawInitHook::InstallAtSymbol(
        "_ZN2al22ExecuteTableHolderDraw4initEPKcRKNS_21ExecuteSystemInitInfoEPKNS_12ExecuteOrderEi"_sym +
        0x2a4);
}
Here you can see a new feature I added to exlaunch in action. A branched inline hook allows you to do a relative jump to an address in the target which turns out to be very useful when hooking a loop.
Putting it together
We have set up everything to be able to add our volume masks to our custom model drawer and to draw it using an executor call. This will happen inside our FallOutFieldDraw instance’s draw function which is called within a hook. That hook injects at a point in time where nothing in the scene is rendered, which is needed to not mask out objects that shouldn’t be affected by the Clip Mask.
struct ClippedMapPartsDrawHook : exl::hook::impl::InlineHook<ClippedMapPartsDrawHook> {
    static void Callback(exl::hook::InlineCtx* ctx) {
        auto* renderVariables = std::bit_cast<al::RenderVariables*>(ctx->X[22]);
        renderVariables->mExecuteDirector->draw("3D (Clip Area Mask)");
    }
};

void initPatches() {
    ClippedMapPartsDrawHook::InstallAtOffset(0x880b1c);
}
At this point in time, the main render target is the bound render buffer. If the Clip Mask is activated we immediately call
modelEnv->prepareModelDraw(viewIndex);
mGSystemInfo->mExecuteDirector->draw("3D (Clipped Map Parts)");
to draw the SimpleClipPartsObjs. We were able to capture the graphics system and draw contexts during initialization
time and can use them now for everything we need. With that we can get the display size from the base color buffer of
the al::GBufferArray which is accessible over the al::GraphicsSystemInfo we captured. al::GBufferArray contains
all the buffers used for the deferred rendering and can be viewed with a patch made by GRAnimated.
Since the size of the base color texture can change at any moment, we have to dynamically allocate the mask texture. The
texture is not writable with cAllocateType_Unk0 so we use cAllocateType_Unk1. Some of the parameters are just copied
from the game’s code.
agl::TextureData* maskTex = agl::utl::DynamicTextureAllocator::instance()->alloc(
            mDrawCtx, "FallOutFieldDraw:ClipMask", agl::TextureFormat::cTextureFormat_R8_uNorm,
            displayWidth, displayHeight, 1, nullptr,
            agl::utl::DynamicTextureAllocator::cAllocateType_Unk1, true, false);
The compositing code will get quite big and some parts are based on raii, so I separated them into functions. We draw the default volume mask first:
void FallOutFieldDraw::renderVolumeMask(const agl::TextureData* maskTexture,
                                        al::GBufferArray* gBuffers, al::SimpleModelEnv* modelEnv,
                                        s32 viewIndex) const {
    agl::RenderBuffer maskBuffer{};
    al::RenderBufferAttacher rba{mDrawCtx,
                                 &maskBuffer,
                                 maskTexture,
                                 nullptr,
                                 nullptr,
                                 nullptr,
                                 gBuffers->mRenderTargetDepth};
    sead::Viewport viewport{maskBuffer};
    maskBuffer.fastClear(mDrawCtx, 0, 1, sead::Color4f::cBlack, 1.0, 0, viewport, false);

    modelEnv->prepareModelDraw(viewIndex);
    mGSystemInfo->mExecuteDirector->draw("3D (Clipped Map Parts Mask)");
}
The graphics api supports MRT, but we only need one texture and the depth target. We reset the texture to black before
drawing with our model drawer from earlier. fastClear needs the index of the target to clear (0) and a ‘mask’ to
specify if the depth/stencil target should be cleared too. We only want to clear the color target so we set it to 1.
Both 1.0 and 0 are the clear colors for the depth/stencil target so we just insert what we want. It also needs a
viewport which we can create from our render buffer. The last parameter is unused.
Custom Shaders
Until now, we were able to cheese our way through without any custom shaders, but now we are left with no other choice
than to accept our fate. After some digging I found out that no one in the Discord server knew how to create custom
compositing shaders. I knew that KillzXGaming was working on a blender plugin which supported adding shaders to the
game. While the blender plugin was not finished at that point in time, he still had made a shader library which could
decompile and compile .bfsha files. The thing about .bfsha files is that the format is quite more complex than what
I needed but the tool didn’t have any support for .sharcb files. Luckily he had already put in some effort into
reversing the format, and I was able to recover all the elements for version 0.0.0.9 using some Ghidra action, educated
guesses and his work. I quickly glued the format parser into libnws because it
had my binary reader primitives and was able to unpack + pack all the shaders from the game 1:1 (checksum matched). This
meant that I could be confident enough to add my own shaders. The generation code looks like horrible Java code because
I didn’t put any effort in making it beautiful at that time.
As you didn’t read in the generation code (since you respect that you shouldn’t read my bad code), each shader needs a
control and a program binary. These are compiled using uam-nvn with the
following command: uam --glslcbinds --nvnctrl=control.bin --nvngpu=program.bin -s TYPE GLSL_SOURCE with TYPE being
vert, frag or one of the other variants and GLSL_SOURCE the shader we want to compile. The shader sources can be
found in the Compositing Section with #version 450 core and precision mediump float; removed.
The shader archive needs data about the uniforms and attributes used so that we can simply use the variable names from
within our code while the shader archive resolves the binding point, location or uniform block offset. You have to
provide the size of uniform blocks for their .sharcb symbol.
When compressed to a yaz0 compressed .szs file we finally have something that can be added in the ShaderData
directory. After adding the name of that archive to SystemData/ProductShader.szs/ProductShader.byml we can get them by
calling al::ShaderHolder::instance()->getShaderProgram(NAME). Don’t forget that there is a limit on the amount of
shader archives that can be loaded into al::ShaderHolder but luckily it exceeds the amount of shader archives we have
right now.
Uniforms
Before activating the shader right away, we have to set up the uniforms. This can be done with another raii class:
al::UniformBlockSetter ubs{mClipDrawParams, 0};
mClipDrawParams->setVector4f(0, getEdgeColor());
mClipDrawParams->setBool(1, mInverted);
I do this in a separate scope so that the cpu cache is flushed immediately after preparing the uniforms. The uniform
block is created in my actor’s initAfterPlacement function with
static constexpr al::UniformBlockLayout sClipDrawParamLayout[] = {
    {0, agl::UniformBlock::Vec4, 1},
    {1, agl::UniformBlock::Bool, 1},
};

mClipDrawParams =
    al::createUniformBlock(sClipDrawParamLayout, std::size(sClipDrawParamLayout), nullptr, 2);
The game calculates padding, stride and offsets for you, but you have to give it some data on the types and array lengths you use.
Combining shaders with render buffers
We can use our new shaders and combine them with our custom texture targets and uniforms to create all sorts of compositing effects. What we need next though, is just some code to blit our mask target to the first downsample target using the threshold program:
void FallOutFieldDraw::blitDownsample2(const agl::TextureData* maskTex,
                                       const agl::TextureData* maskTexDownsample2) const {
    agl::RenderBuffer buffer{};
    al::RenderBufferAttacher rba{mDrawCtx, &buffer, maskTexDownsample2, nullptr, nullptr,
                                 nullptr,  nullptr};

    mBlitContext.apply(mDrawCtx);

    blitWithShader(*maskTex, "caThresholdProgram", false);
}
mBlitContext is just a agl::DrawContext that has blending and depth testing disabled. blitWithShader is what
actually does the draw call:
void FallOutFieldDraw::blitWithShader(const agl::TextureData& texture, const char* programName,
                                      bool ignoreCDParams) const {
    agl::TextureSampler sampler{};
    sampler.applyTextureData(texture);

    agl::ShaderProgram* program = al::ShaderHolder::instance()->getShaderProgram(programName);
    program->activate(mDrawCtx, false);
    al::activateSampler(mDrawCtx, &sampler, program, "uTexture");

    if (!ignoreCDParams) {
        agl::UniformBlockLocation uniformBlockLoc{"ClipDrawParams", *program};
        mClipDrawParams->setUniform(mDrawCtx, uniformBlockLoc);
    }

    agl::utl::VertexAttributeHolder::instance()->mVertexAttributes[8].activate(mDrawCtx);

    agl::IndexStream& stream = agl::utl::PrimitiveShape::instance()->mSomeIndexStream;
    auto addr = nvnBufferGetAddress(&stream.mBuffer);
    nvnCommandBufferDrawElements(mDrawCtx->getCommandBuffer()->pNvnCommandBuffer, stream.mDrawMode,
                                 stream.mIndexType, stream.mCount, addr);
}
We set up our texture for the sampler, get the program and bind it. Then we can activate the sampler for our bound
program and add the ClipDrawParams uniform block if needed. the VertexAttributeHolder holds a lot of different
vertex attribute combinations with one being useful for drawing a framebuffer rectangle. The members probably all have
names and are not stored in an array but that was faster for me to do. We then get the index stream that represents the
vertices in our rectangle and init the draw call.
Both the next downsample and blur passes aren’t interesting, so we skip those here. The composite and mask passes require us to bind the main buffer again, so we do it like in the game’s code:
s32 viewBufs = 3;
u16 unk = *std::bit_cast<u16*>(mGSystemInfo->mTemporalInterface);
if ((unk & 0xff) != 0 && 0xff < unk) {
    viewBufs = 4;
}
gBuffers->bindRenderBuffer(mDrawCtx, viewBufs);
This is obviously almost straight up stolen from Ghidra’s lifter, but it does its job. In the combination pass we enable default blending behaviour and blit the downsampled + blurred mask onto the main buffer. The last step is to mask out what needs to be masked out with a draw context that enables depth writing so that we can reset the z value to 1.0. If we didn’t do that, the game would think that the object still exists and adds some color in a later pass, nullifying the Clip Mask.
Final Words
And there we have it, one of the most interesting effects used in Super Mario Galaxy implemented in Super Mario Odyssey. I hope this article was interesting or helpful. I’d like to thank a few people here for helping during the development:
- Slycer for being a great rubber duck and providing the romfs files
- KillzXGaming without whom I wouldn’t have been able to fully recreate the
.sharcbformat - The noclip team for porting the Clip Mask, making the recreation a lot easier
- Kirbymimi for debugging some problems in my code when ub was my biggest enemy
- GRAnimated for the basis of the debug drawer code
- The Odyssey Modding Discord Community for answering a few questions
- The Luma’s Workshop Discord Community for answering a few questions